Aqualux Fleck 5600SXT Water Softener Installation, Programming and Startup Instructions
A most sincere thank-you for your purchase of the Aqualux Fleck 5600SXT water softener! We look forward to helping make this experience an excellent one for you.
This page contains everything you need to know about the preparation, installation and programming of your new purchase! Here's what you'll learn below:
- Tools Needed & Pre-Installation Shopping List
- Installation Overview: The Big Picture
- Installation Specifics: What Connects To What
- Control Valve Programming
- Commissioning (a fancy word for firing things up!)
HERE WE GO!
Tools & Shopping List
Every successful project begins with the right tools and supplies. Below is a list of what you'll need to purchase, and the tools you'll need to complete the task. Please note - this section does not address the supplies or tools you'll need for plumbing the softener to your existing pipes. Every plumbing situation is different, and we just can't cover all of the possible scenarios. We ship our softeners pretty much fully assembled, but there are a few things you'll need to put together.
The Tools
- Flat head screwdriver
- Adjustable wrench
- 1/4" nut driver (optional - can use flat head screwdriver instead)
The Shopping List
- Water Softener Salt - at least one bag, but should probably buy 4 or 5 (read this article about salt if you're not sure what to buy)
- 1/2" inner diameter drain line tubing (long enough to comfortably run from the softener control valve to where the softener will drain). Most installers use clear vinyl tubing available at every hardware store
- Gear clamp - image below - for securing the drain line to the drain line barb
![]()
Installation Overview
This section gives you a broad-level picture of what the installation of your softener involves. It also helps to create some context for the more detailed sections that follow. Here's a picture that shows the major components:
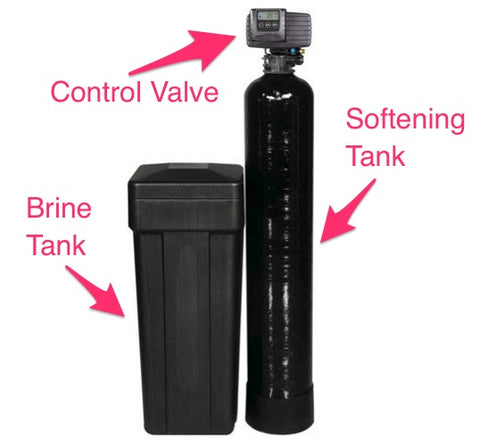
Your water softener installation involves the following steps:
- collecting the tools and supplies for the job
- determining the best spot to put your softener
- connecting some components to the softener
- connecting the softener to your plumbing
- programming the control valve for your water conditions
- adding salt and doing the first regeneration
Where To Put Your Softener
Find a spot for the softener where you have easy access to the pipe that the softener will be installed on. Your softener will have a drain line used to discharge waste water when the softener regenerates. If your water pressure is good, a drain line can be run horizontally for 45 feet without issue. If your pressure is poor, limit this to 25 feet. During the regeneration, the softener will expel between 30 and 75 gallons of water and brine solution (depending on the size and model). So make sure your drain receptacle can receive this volume. Also make sure the drain line is secured so it can't move around or become dislodged.
Make sure the softener is placed on a level surface - you don't want to have to move the softener after it's full of water, so choose the location carefully. The softener also needs to be placed where it will not be exposed to freezing temperatures, rain, or snow.
Connecting Components
There are a few components of the softener that you'll need to connect to the softener on site. These include the connection of the drain line, the connection of the brine line to both the control valve and the brine tank, and the connection of the bypass valve.
Plumbing Your Softener
Plumbing your softener is one of the most important steps in the proper installation of your machine. Unfortunately almost every plumbing job is different - the location, proximity to drain, materials, diameters, and plumbing codes are all specific to the job. It makes it virtually impossible for us to provide detailed plumbing instructions. However, in a section below, we provide you with many general guidelines that will coach you through this important step.
Programming The Control Valve
The control valve needs to be programmed so that it matches the size of the softener, and the local conditions of your water. The programming also has major implications to the salt efficiency. We show you how to program your machine for max efficiency!
Adding Salt & Startup
Your softener regenerates with salt, so you'll need to have some in the brine tank when you're ready to put the softener in service. The startup involves filling the softening tank with water, adding some salt and water to the brine tank, and initiating the first regeneration so you can make sure everything is doing what it's supposed to do!
Installation Specifics - Connecting The Components
The first step is to connect the brine line to the control valve. The brine line can be found by taking the lid off the brine well (the brine well is a 4" diameter white tube that can be found in the brine tank). The brine line is a 3/8" black plastic tube that connects the control valve to the brine tank. At different stages of the regeneration process, fresh water is pumped into the brine tank, and salt water brine is sucked out of the brine tank. Here's how the brine line is attached:
The other end of the brine line needs to be connected to the brine tank:
At different stages of the regeneration of your softener, water will be sent to drain. We need to connect a drain line to the Fleck 5600SXT control valve for this purpose. The open end of the drain line can be discharged to a few different places (depending on climate and local plumbing code):
- discharge the drain line outdoors to a pit, swale, or lawn
- discharge to a floor drain
- attach the drain line directly to a household drain pipe
Many water softeners are installed on rural water systems that also have a septic system. Water softener drain water is safe to discharge to your septic system. Keep the following in mind for your drain line:
- make sure the drain line isn't kinked, bent, or twisted
- make sure the drain line cannot ever freeze
- the open end of the drain line must be secured or else the force of discharging water may cause it to move
- if discharging to a floor drain or other drain, make sure you leave an air gap (a separation between the end of the drain tube and the standing level of the water)
- the drain line can be elevated a few feet above the height of the softener without impairing performance
- if your water pressure is good a 45' horizontal drain line run is fine. If water pressure is poor, try and limit this to 25'
- for poor water pressure, you can increase the diameter of the drain line to limit the back-pressure created
The Fleck 5600SXT requires a drain line tube with 1/2" inner diameter. Most installers choose clear vinyl tubing as it's easy to work with, and because it's clear you can see when water is flowing through it. Here's how the drain line is connected to the Fleck 5600SXT:
Now connect the bypass valve and plumbing connectors. These are held in place with small metal clips. Important - the metal clips only hold the plastic parts together. Over-tightening the metal clips does not bring the plastic parts closer together, and this over-tightening may damage the plastic softener parts.
The inlet and outlet of the bypass valve are each controlled with their own handle on the bypass. Each handle is labelled. The softener is in 'bypass' mode when both handles are turned to 'bypass' which puts the handles at a 90 degree angle to the flow of water. The softener is in service mode when both handles are turned parallel to the incoming and outgoing water. Once the bypass and plumbing connectors have been connected to the control valve, put the bypass in bypass mode.
Next, connect your existing plumbing to the threaded plumbing connectors you just attached to the bypass. These plumbing connectors are 3/4" male NPT threads. These are standard plumbing threads and are compatible with a wide variety of plumbing fittings.
Since every installation is different it's difficult to provide step by step instruction on how to plumb your softener to your existing lines. But here are some important points to keep in mind:
- use a small amount of teflon tape on threaded fittings
- if using braided connectors or other plumbing aids, make sure the inner diameter is the same as your native plumbing material otherwise you may create a bottleneck
- make sure the weight of your plumbing is not being supported by the softener bypass (secure plumbing lines to the wall or ceiling to support their weight)
- make sure your plumbing is aligned well - you don't want the plumbing to exert much side-to-side force on the bypass assembly - this can open up small gaps between o-rings and cause leaking
- we highly recommend Falcon Flex Connectors if you want to save a lot of time and effort on your installation
- arrows on the bypass show which side the raw water enters and which side the soft water exits - very important to get this right!
Now we need to program the Fleck 5600SXT control valve. Plug the power adapter into a wall outlet and let's get started. When programming the softener, there are two programming steps that are important in determining the salt efficiency of the softener - the Capacity (C) and Brine Fill (BF). Different sized softeners will require different values for these settings. Use the following settings to operate your Fleck 5600SXT in a highly efficient manner:
| Softener Size | Capacity (C) Setting | Brine Fill (BF) Setting |
| 0.75 cubic feet | 15 x 1000 | 3 |
| 1.0 cubic foot | 20 x 1000 | 4 |
| 1.5 cubic feet | 30 x 1000 | 6 |
| 2.0 cubic feet | 40 x 1000 | 8 |
Startup
Your softener is now plumbed, programmed, and ready to go! Here are the steps to take to put your softener into service:
Fill The Softening Tank
Ensure that the bypass valve is in 'bypass mode'. Bypass mode is when the handles on the bypass valve are turned at 90 degrees to the flow of water. It looks like this:

If you shut off your home water for the installation, now is the time to turn it back on. To fill the softening tank with water, open the bypass outlet valve all the way, and open the inlet side of the bypass valve until you can hear water slowly filling the tank. When the tank is full, open the inlet side of the bypass all the way.
At this point we suggest adding half a bag of salt to the brine tank. Adding more than this prevents you from being able to see if water is properly being added and removed from the brine tank during the regeneration.
Once the salt has been added, add three gallons of water to the brine tank and let this sit for an hour. Then force a regeneration of the softener. This is done by pressing and holding the 'next cycle' button on the control valve:

Press and hold the 'next cycle' button until you hear the control valve motor start to move, then let go of the button. This initiates the regeneration manually. Normally your water softener will initiate the regeneration automatically based on your water consumption.
Important - check on the softener periodically during this first regeneration to make sure nothing is leaking, and that the drain receptacle can accommodate the flow of water.
The entire regeneration process will take about 1.5 hours and forcing this regeneration accomplishes a number of important steps
- rinses any residue off the water softener resin
- provides an opportunity to check all water connections (plumbing, drain line, brine line) for leaks
- allows visual confirmation that water is being pulled out of the brine tank
- softener automatically adds the correct amount of water to the brine tank
During this regeneration process there are several stages that softener will complete:
- BW (backwash): water flows from the bottom of the tank, to the top to dislodge trapped sediment
- BD (brine draw): brine solution is drawn out of the brine tank and is slowly pushed through the resin bed in the softener
- the brine draw is 60 minutes long, but it's completely normal for all brine to be gone after 20 minutes
- during the first regeneration be sure to check the brine draw cycle after 30 minutes to make sure the brine has been drawn out. This confirms that the brine connection at the control valve and brine tank have been made correctly.
- RR (rapid rinse): any residual brine solution is rinsed off the resin
- BF (brine fill): the softener adds a measured amount of water back to the brine tank
Your installation is now complete - way to go! Your water softener will now soften any water that is passed through it. Cold water will be soft instantly, but remember that your hot water tank still contains hard water and it can take a while for this to be flushed through.
It can be hard to judge when to fill the brine tank. Once you're sure that everything is working well (water being added to brine tank, and brine being drawn out) we suggest that you fill the brine tank full with salt. It will hold just over 200 pounds. Check on the brine tank after a month and see how much the salt level has dropped - this will give you an idea of how often it will need to be filled.
The performance of the softener is not dependent on how much salt is in the brine tank. As long as there is any undissolved salt in it, it will perform perfectly well. For questions about which salt to use, please read this article.